Importing V201x projects and data into the WSCAD SUITE 2018
If you want to use your existing projects and data with the new WSCAD SUITE 2018, you can now import projects, part data and WSCAD components, as well as configuration settings, from previous WSCAD SUITE 201x versions to the new WSCAD SUITE 2018 in one step.
Of course, you can still import projects, part databases, WSCAD components, and configuration settings one by one. If necessary, projects and data can also be transferred from a WSCAD 5.x version.
For a more detailed description of the project and data import please refer to the online help or to the PDF: WSCAD installation folder/Docs/
WSCAD_SUITE_2018_Project_and_Data_Import.pdf
The WSCAD components include
- Symbol libraries
All libraries from the Symbol Explorer. Stored in the “Libraries” directory. - Frames and forms
as well as labels and legends All templates from the Template Explorer. Stored in the “Templates” directory. - Macros
All macros from the Macro Explorer. Stored in the “Macros” directory. - Databases
e.g., lexicon, addresses, manufacturers, … – but no part databases. Stored in the “Databases” directory. - Project templates
Predefined sets of frames and forms for the lists and plans. Stored in the “Patterns” directory. - Logos
Stored in the “Logos” directory. - Data Sheets
Stored in the “Externals” directory.
The configuration settings include
- Toolbars
predefined, changed and newly created toolbars - Work areas
predefined, changed and newly created work areas - Settings
the user-specific and program-specific settings changed under Tools | Settings (options) (e.g., for directories, colors, reports, texts, …)
Sequence for importing projects and data
If you want to import your projects, part data, WSCAD components and configuration settings from a previous WSCAD SUITE 201x version into the new WSCAD SUITE 2018, follow steps 1 through 6:
- Install the new WSCAD SUITE 2018 parallel to the previous WSCAD SUITE 201x version, e.g. to “C:\WSCAD\WSCAD SUITE\2018”.
The new version must not be installed in the existing installation directory of the previous version, since important projects and data could be overwritten as a result. - Save the complete WSCAD SUITE 2018 installation directory, so that you have access to the original data again if the import fails.
- Open the new WSCAD SUITE 2018.
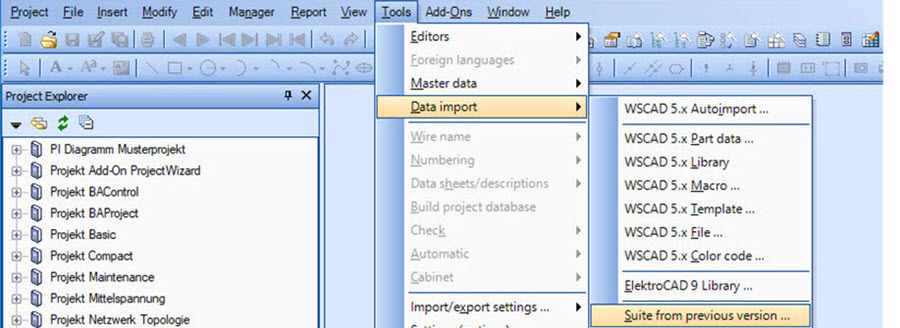
- Import projects, part data, WSCAD components and configuration settings of the previous version in one step from the main menu via Tools | Data Import | Suite from previous version.
- Close the new WSCAD SUITE 2018 and restart.
- Synchronize symbols and color codes if required via Tools | Master data | Symbol Manager and Tools | Master data | Color codes… | Import.
Import projects and data
Prerequisite: all projects are closed.
1. Click in the menu on Tools | Data import | Suite from previous version. Step 1 of the project and data import wizard opens.
2. Enable the check box Save settings (recommended). Depending on the setting in step 2 of this wizard, configuration settings will also be overwritten. A backup of the configuration settings should therefore definitely be created. The backup is stored in the program directory under Settings/<username>/*.wsCFA. It can be restored again at a later point in time with the menu command Tools | Import/export settings | Import.
3. Click Next. Step 2 of the project and data import wizard opens.
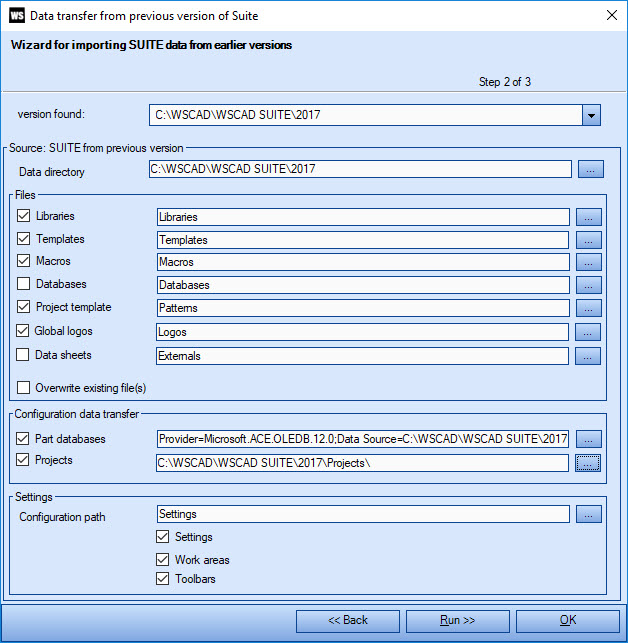
4. In step 2, under version found, the latest installed versions are displayed.
5. To select a previous version for the project and data import, you have the following options:
- Select the installation path of the previous version from the version found drop-down list. The Data directory is updated.
- Navigate in the Data directory field to the location of the desired version using the Browse symbol button.
6. In the Files pane, select the check boxes of the WSCAD components to be taken over. If required, use the Browse symbol button to change the directories from which the WSCAD components are taken over.
7. If you select the Overwrite existing file(s) check box, the current files will be overwritten with the files from the previous version.
8. If you want to additionally import your part database, select the Part databases check box in the Configuration data transfer area and click the associated Browse symbol button. The first two dialog pages of the part data transfer are called. Here you can select the part database whose parts are to be imported and also make the field assignments. Typically, you do not need to change the field assignments.
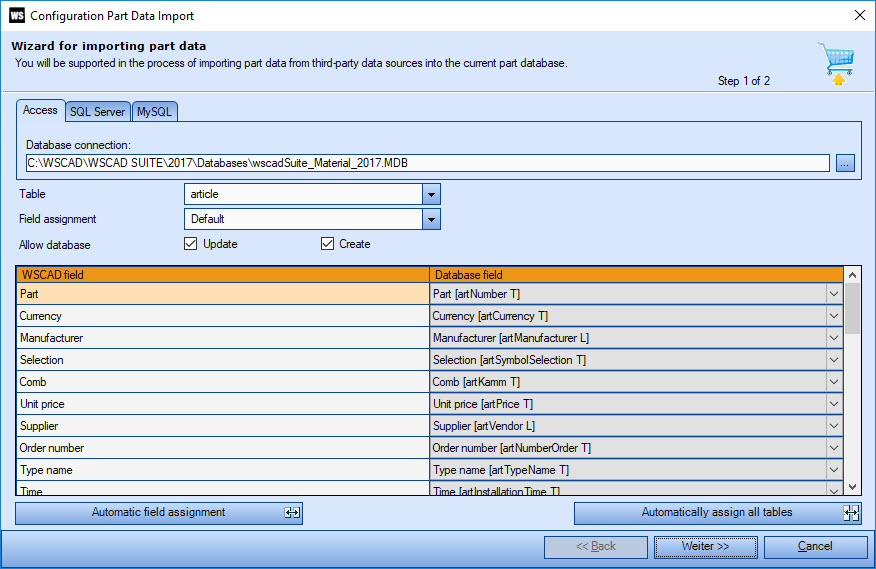
9. Click Next, and then click Finish to finish the settings for the import of the article database.
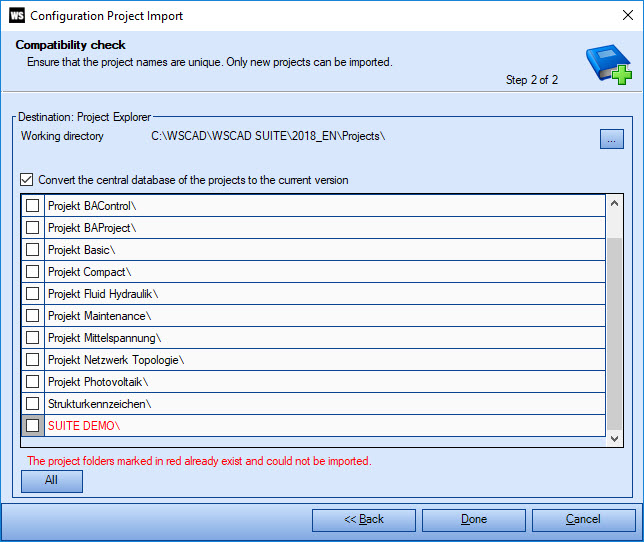
10. If you want to additionally import your projects, select the Projects check box in the Configuration data transfer area and click the associated Browse symbol button. The first two dialog pages of the multiple project import are called. You can then select the directory with the projects to be imported there. You can also exclude individual projects from the import. If the check box Convert the central database of the projects to the current version is selected, the central databases of the projects are converted in sequence on running the wizard. Depending on the number of projects and the project size, this can take some time. If the check box is cleared, the projects are converted when opened.
11. Click Next, and then click Finish to finish the settings for the project import.
12. If you want to import the configuration settings from the previous version as well, select the check boxes of the settings in the Settings pane.
Note: project-specific configuration settings are not imported.
13. If the configuration settings are not stored in the default program directory under Settings, navigate in the Configuration path field to the storage location using the Browse symbol button.
14. Click Run. The progress of the data import will be shown in step 3.
Note: count shows the number of data items in the previous version, copy shows the number of copied files. If the Overwrite existing file(s) check box was selected, the values of count and copy should be the same.
Note: If you want to import projects and also build the central database in the process, the data import may take some time.
15. Finally, click Done. The project and data import will be completed.
16. Depending on the selection of the components, a restart of the WSCAD SUITE is necessary.

Thomas Janowicz
Technical Writer,
Documentation Management