Import CSV file
You can import the part data of a CSV file into the current WSCAD SUITE part database. Each column of the CSV file can be assigned to a part database field in the process. Even columns in different languages (e.g., with the part names additionally in English and French) can be imported multilingually.
When importing, you specify whether the CSV file contains column headings and with which character the individual data records are separated from one another (e.g., semicolons or tabs).

Notes
The separator should not be contained in the table data, even within quotation marks. In such cases, the record will not be imported or will be imported incorrectly.
If a CSV column is assigned to a part database field of the type Number or Floating point number, the corresponding CSV column must be filled correctly; otherwise, the import will abort.
Save current WSCAD SUITE part database
First, make a backup of the current WSCAD SUITE part database. If the parts are then not imported as desired, you can always access the backup copy.
1. First, check which part database is being used. To do this, click on the main menu command Tools | Settings (options) | Master data | Part. Here you can see which type of part database is being used (Access, SQL Server or MySQL).
Note: The set part database is project-dependent. It is thus possible that another project may use a different part database.
2. You can determine the storage location of the part database via the Open symbol button.
Note: By default, the part databases are stored under the Databases folder in the WSCAD installation directory.
3. Navigate with Windows Explorer to the storage location of the part database and copy it into a directory of your choice.
Import CSV file
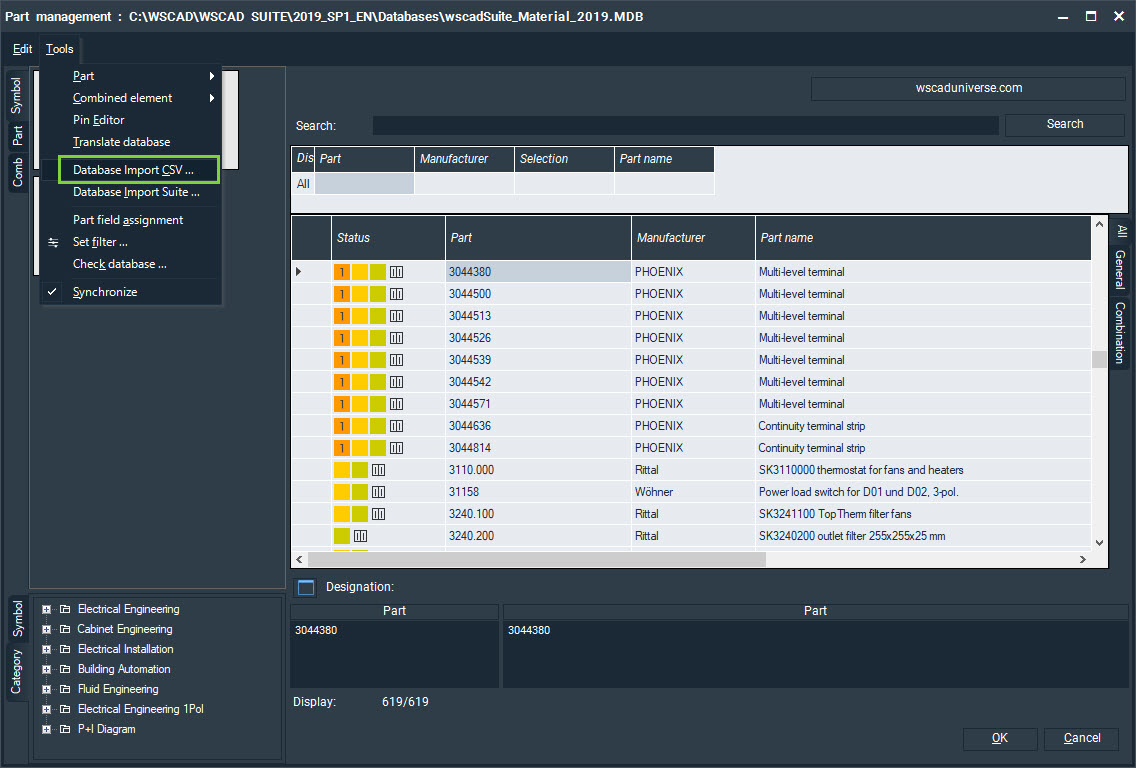
1. Click on Tools | Master data | Part management. The Part management dialog opens.
2. Click in the menu of the Part management on Tools | Database Import CSV. The Part database converter wizard opens.
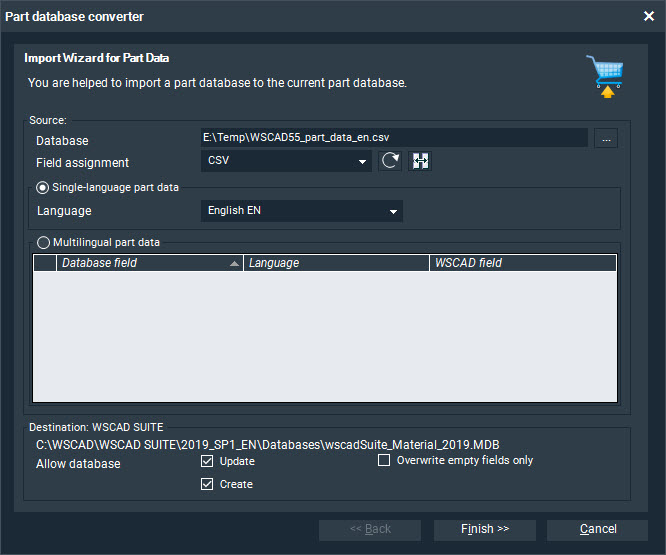
3. Using the Browse symbol button next to the Database field, navigate to the CSV file and open it. The following dialog appears:
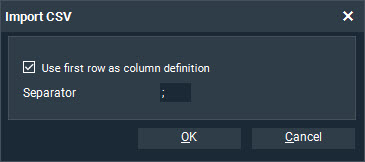
4. If your CSV file contains column headings, select the check box Use first row as column definition.
5. Enter the delimiter that separates the records in the CSV file. By default, this is a semicolon or a tab.
Note: You will see this when you open the CSV file with a text editor.
6. Click OK. The Field assignment dialog opens.
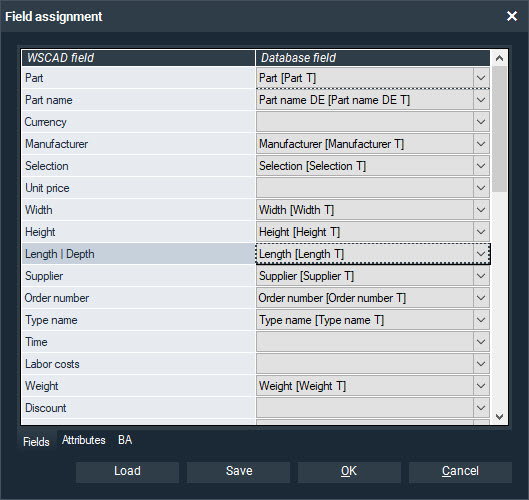
7. Map the columns in the CSV file to the WSCAD part database fields:
- If the CSV file contains column headers that are named identically to the fields in the part database, the mapping occurs automatically. Assign the columns of the CSV file to the WSCAD fields on the left via the drop-down lists on the right.
- If the column headers do not match the part database fields or the CSV file does not contain any column headings, you can make the assignments manually. Assign the columns of the CSV file to the WSCAD fields on the left via the drop-down lists on the right.
- Also make the assignments in the Attributes and BA You can use the plus symbol button to create new attributes and to assign column headings to these attributes. The minus symbol button can be used to delete created attributes.
- If required, you can save the field assignments you specify here in the .wsFZO file format. Previously saved field assignments can be loaded.
- Close the Field assignment dialog with OK.
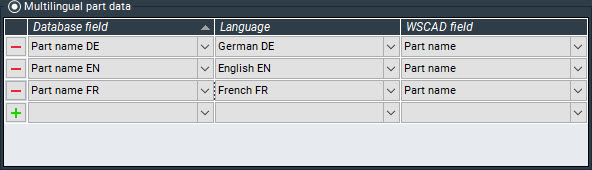
- If the part data to be imported is monolingual, select the language in the Language drop-down list.
- If you have multilingual part data (e.g., with the part names in different languages and a separate column for each language), you can transfer these translations to the database as well. To do this, select the radio button Multilingual part data. Select the column from the CSV file under Database field, enter the language under Language and then select the desired WSCAD field under WSCAD field.
You can use the plus symbol button to add more columns from the CSV file and assign them to WSCAD fields. With the minus symbol button, you can delete the entries again.
- Finally, set the following options:
- Update:
If this check box is selected, existing records will be overwritten with the new data. If the check box is cleared, existing records will not be overwritten. In that case, you can only create new records. - Overwrite empty fields only:
(only selectable if the Update check box is activated) If this box is selected, only the empty fields of existing records will be overwritten. If the check box is cleared, all the data of existing records will be overwritten. - Create:
If this check box is selected, new data records will be created if the records do not already exist. If the check box is cleared, no new records will be created. Only existing records are updated.
- Click Finish. The parts are imported. In the left half of the dialog, the column with the plus symbol shows you the newly added parts, and the column to the right shows the changed parts.
- Finally, click Done.
I hope this blog post has helped you. For any questions to the CSV part import please contact our support team.
You can download this blog post here:
[button color=”extra-color-3″ hover_text_color_override=”#fff” size=”medium” url=”https://blog.wscad.com/wp-content/uploads/2019/03/Blog_csv_Artikelimport_EN.pdf” text=”PDF Download” color_override=”” image=”fa-play”]

Thomas Janowicz
Technical Writer,
Documentation Management